MonkeDonkeDev: C++ and Unreal Engine
Engine Version: 5.3.1
Introduction
In this tutorials I will show you how to (in C++):
-
enable enhanced input system
-
create inputaction and input mapping context assets
-
add input mapping context to the subsystem
-
bind functions to input action
Tutorial
First we need to enable the enhanced input system via the <ProjectName>.Build.cs file. We will add the enhanced input module here. On line 11, we added "EnhancedInput".
Now, lets add the necessary input assets in the editor: InputAction and InputMappingContext. Open the editor and right-mouse click on an empty space in the content browser and browse to Input->Input Action and Input->Input Mapping Context.

Lets create a test input action and a test input mapping context: add a bool value type in the input action, and add this input action to the mapping context and lets bind to the key 'k'.

Next, we are going to set it up in C++. First we create a test player controller, implement the SetupPlayerinputComponent in it and bind functions to the input actions.
In a test playercontroller, we add a pointer to a mapping context. In this simple example, I used a pointer, but we can also use TSoftObjectPtr or a FSoftObjectPath.
In the implementation, we get the local player and then the local enhanced input subsystem from it. At last, we add the input mapping context to the subsystem.
After we added the mapping context, we can start binding functions to the input actions. But how do we access the input actions?
In this example, we will use UPROPERTY, like we did with input mapping context. Later, we set these properties in the derived blueprint of this custom playercontroller class. We create a UPROPERTY in the header file of the player controller and a test function OnTestInputAction which we will bind to the input action. Note the function signature: return value is void and a parameter is of type FInputActionInstance.
We need to cast the inputcomponent to UEnhancedInputComponent first and then call the BindAction function from it. We pass the inputaction, the triggerevent (which I will go deeper into in another tutorial) and the test function we created.
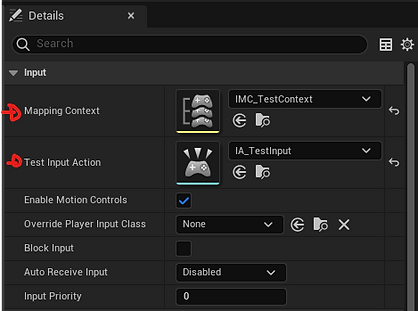
At last, we open the editor, create a gamemode blueprint, a playercontroller blueprint which inherits from our custom playercontroller. Then in the playercontroller blueprint, we set the inputaction and input mapping context. In the level, we set the gamemode to our custom gamemode and set the default playercontroller to our custom player controller.
Now, when we start the game and we press K, in the outputlog, we should see our result printing.

Voilà! I hope you enjoyed the tutorials and stay tuned for more!