MonkeDonkeDev: C++ and Unreal Engine
Showing logs on screen
Engine Version: 5.4.2
Introduction
In this tutorials I will show you how to:
-
Use debug screen messages in Blueprints
-
Use debug screen messages in C++
Tutorial
Blueprints
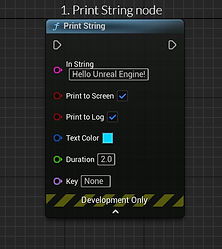
The most straightforward way to just print some logs on the screen is by using the Print String node. This node can print logs on the screen AND output log.
Parameters:
-
In String: the string you want to show on the screen
-
Print to Screen: this is enabled by default. It means that this the string will be shown on the screen
-
Print to Log: if this is enabled, it will show the string in the output log
-
Text Color: the color of the text shown on the screen. This color is NOT applied on the string printed to the output log.
-
Duration: how long the string should be displayed on the screen
-
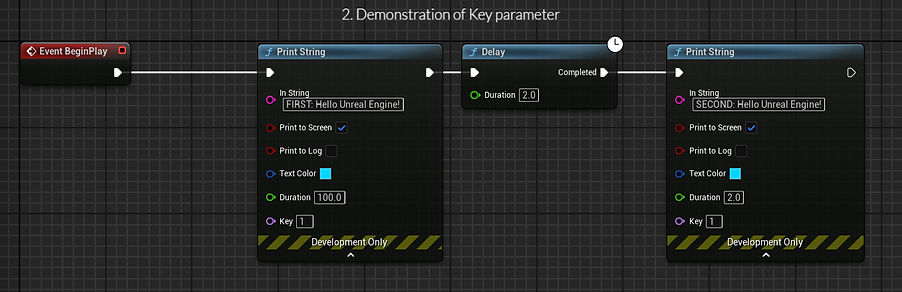
Key: if you give a key, other than none, it will replace the string, which is printed on the screen, with the same key. So for example: you print a text. Just to illustrate this, try out the following combination, in image 2., of nodes and you will see that the second print string will replace the first one after two seconds.
C++
The function which is used to print on screen is AddOnScreenDebugMessage. The function declaration is as follow (in UEngine class):
Lets go over the parameters:
-
Key: A unique key to prevent the same message from being added multiple times. This means the same as the blueprint's Print String node. When another print function is called with the same key, that will replace the older printed string with the same key.
-
TimeToDisplay: How long to display the message, in seconds.
-
DisplayColor: The color to display the text in.
-
DebugMessage: The message to display.
-
bNewerOnTop: If the newer message should appear on top of older ones
-
TextScale: Scale of the message
Examples of C++
Lets create some examples. We use GEngine variable to access the function. GEngine is a global variable which is accessible from everywhere. A check of GEngine, before using it, is advised.
Example 1:

This will give the following result. This string will be dispayed for 222 seconds on the screen.
Example 2:
Here we added a second print but with the SAME key. What happens is: the second print will replace the first print because we use the same key.

Example 3:
Here we changed the bNewerOnTop variable to false. Usually, the newer ones will appear on top of older ones. But now, the newer one (blue text) will appear at the bottom of the older one (red text)..

Example 4:
Here we changed the scale of the first print (red) to a large text.

Conclusion
That's it for this tutorial! I hope you liked it and stay tuned for more! I also share small tricks on X-platform: https://x.com/NeskekTutorials